Maple Roasted Salmon

140 grams-maple syrup

80 grams-grainy mustard

5 grams-vanilla

8 grams-garlic, minced

12 grams-rosemary, fresh and minced

5 grams-thyme, fresh and minced

60 grams-sunflower oil

8 grams-salt

2 grams-white pepper

5 grams-smoked paprika

4 – 6 salmon fillets @ 6 oz or 170-gram portions

Measure and combine all ingredients, minus the salmon.  Place salmon in large zip lock bag or choice of container, poor in marinade, and coat salmon with marinade. Allow to marinade for 4 hours or overnight. Bake at 250 C/ 420 F for 6-8 min or until desired temp. Alternative, can be done on BBQ or cedar planks.

Wild Rice Pasta… why not?

This past weekend I had the pleasure of doing a birthday dinner for the sister of a friend of ours.  Four courses with no rush or time limitations, what a great chance to play with a new idea.  Wild Rice Pasta!

For the past couple of years I have been thinking of ways to use wild rice in my cooking to make it fresh and not just your ordinary “starch” on a plate or “hey, lets add wild rice to the dish to make it cost a little bit more and make is exotic”.  To me, this indigenous ingredient that has been used by the First Nations people of North America for centuries, it can and has so many more uses, so why not play.

I have used it in breads, stuffing, desserts, even included it in a variation of a Three Sisters Salad (corn, beans and squash), so why not pasta.  The birthday party gave me a great opportunity to take this project on and to use it on one of my dishes, Seared Confit Octopus and Wild Rice Pasta with Arugula Puree.

I busted out my “go to” pasta recipe and started to do some deep thinking, trying to play out in my head what ratio of flour to rice would I need, how much more liquid or egg yolk should I use?  How fine to grind the wild rice?  With all this in mind, I started, making sure to document everything down as I knew there was no way I was going to get this right on the first try.  With that being said, first try, fail, the dough after resting absorbed to much liquid and became hard and dry, not even playable. Second attempt, adjusted yolk and liquid and was able to bring together something that was workable, just had to hydrate it slightly while rolling out to keep it pliable.

Final product was something that had a high-density chew but was a welcoming contrast to the dish. Definitely something that I will be continuing to perfect.

IMG_5725

Seared Confit Octopus, wild rice pasta, arugula puree.

Wild Rice Pasta

5 oz – AP flour

3 oz – Wild rice, finely ground

7 – Large egg yolks

1 – Egg

2 tbsp – Milk

Procedure:

Weight out wild rice, place in spice/ coffee grinder and grind till as fine as you can possible get.  Add to a large bowl with the AP flour and set aside.

In another bowl, combine and yolks, egg and milk and mix tilled combined.  In the bowl of flour and rice mixture, make a well in the centre and add the wet ingredients, using a fork, gradually mix, slowly incorporating the dry ingredients till a mass comes together.

Place mixture on floured surface, dust with flour and kneed till everything comes together and is slightly sticky, more flour may be used if necessary.  Divide in two and flatten, wrap in plastic wrap and rest in refrigeration for 30min, allowing to come to room temperature for at least 30 min before using.

Set pasta machine on highest number (7 on mine), lightly dust dough and pass through machine, twice.  Repeat till you reach the third number down from your highest number (5 on mine), *please note that from time to time should the pasta feel like it is drying out or is not as playable, you may gently rub a couple drops of water to the surface of the pasta, fold over the pasta and pass through the machine on the last setting before rolling through the original setting.

Cut to desired type of pasta.

Image 3

Image

Image 2

Warm Smoked Salmon

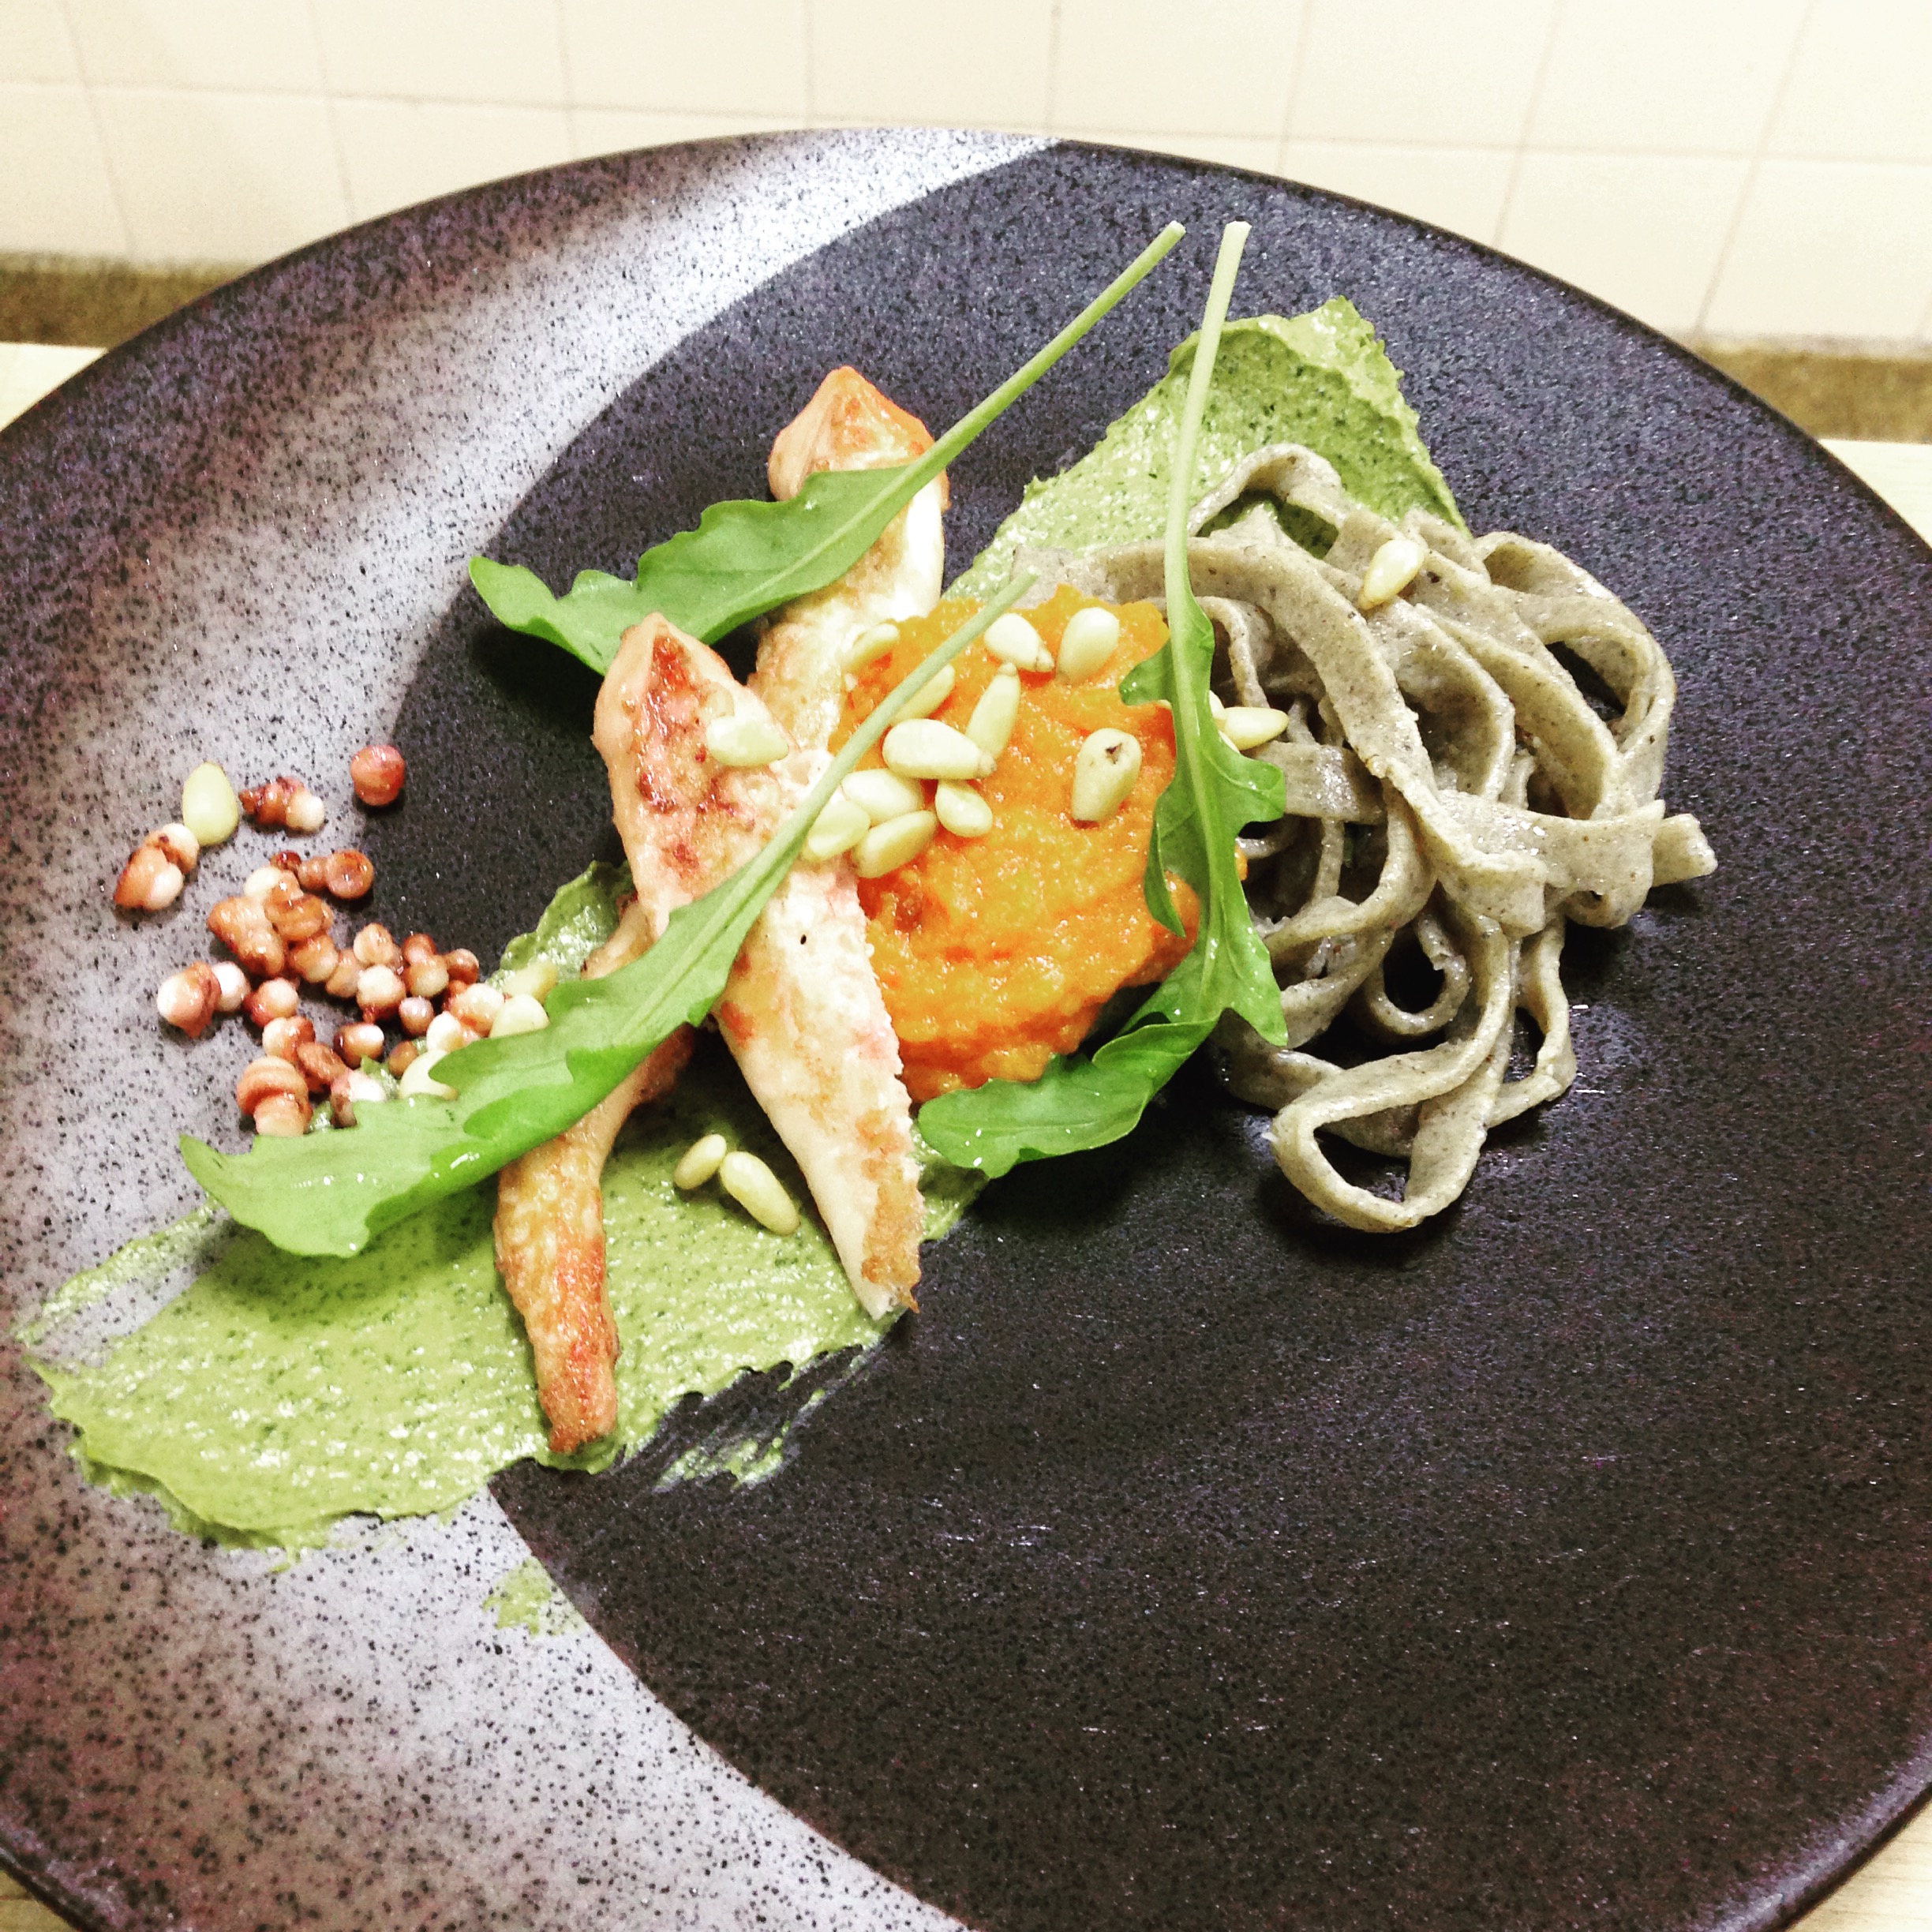
So, back in August I did an event with a friend of mine here in Rio de Janeiro by the name of Leandro who happens to own and run a recording studio. The idea was to provide a four course meal up to 16 guest with music selected to go with the flow of the night and compliment the food.

The night went very well considering that it was the first time he had ever had something like this in his studio, and the fact that he is not set up with a kitchen. So with this in mind and careful planning, we set up a kitchen with just what we needed and designed a menu that would work for ease of execution at the studio but would still please the guests.

One of the dishes we did was a warm smoked salmon. I was really proud of this dish as it made for a great little appetizer plus it gave me the opportunity to share with the guest some cuisine from my aboriginal people back home in Canada, something that is known very little about here in Rio.

Plus what is great about this dish is that it can be done at home. You just may need some ventilation (for the smoke part).

IMG_0164

Cured and Smoked Salmon with Pickled Celery and Cucumber

Smoked Salmon

Cure mix : Combine the salt and sugar and keep to the side

Kosher Salt – ½ cup

Sugar – ¼ cupSalmon – 400- 500gr, cut 2-3 inch long and approximately ¾ inch (2cm) thick

Wood chips – ½ cup total. ¼ wet & ¼ dry, wrapped in foil with holes poked in the top.

Procedure:

On a sheet of plastic wrap (16inches long), sprinkle half of the cure mix as a base on the plastic wrap in the center and place the salmon pieces on the salt and sugar mix making sure to leave ½ cm of space between the salmon pieces. Sprinkle remaining cure mix on top of the salmon and wrap the fish up with the excess plastic wrap. Then double wrap again with another sheet of plastic wrap insuring that it is fully wrapped and will contain any excess moisture if needed. Place on a sheet pan or plate and place in the fridge over night to cure.

The next day, remove fish from fridge and rinse three times with fresh cold water for 15-20 min each time to remove excess cure mix to avoid a over salty product. Dry fish by patting dry with paper towel and place on a lightly oiled rack, preferably on one side (opposite from where you will be placing your smoke chips).   Place your wood chips in large roasting pan on the opposite side from where the fish will be and place the rack in the roasting pan.   At this point, make sure to have a piece of aluminum foil large enough to cover the pan securely ready to go.

Place the pan on a stovetop with the side of the pan holding the wood chips over the burner top, gas or electric will work, turn burner on to high heat and bring wood chips to a full smoke, 2-5min depending on how wet the wood chips are. Once they are smoking, cover the pan with the foil and allow pan to fill with smoke for 3 min then turn heat to low for 5 min. After 5 min, turn off heat and allow to fish to sit in the smoke for 10min.

After 10 min, carefully remove foil and allow salmon to cool on the rack before moving to storage container and keeping in the fridge.

Pickled Celery and Cucumber

2 – Japanese cucumbers or ½ a Long English cucumber, sliced thin

2 – Celery stalks, sliced thin

1 cup – vinegar

1 cup – white sugar

1 – clove garlic

1 – bay leaf

Pinch of salt

Procedure:

Place cucumber and celery in separate containers with adequate room between them and the top. Keep to the side

In a medium pot, combine vinegar, sugar, garlic, bay leaf and salt and bring to a boil. Allow to cool till warm and divide mixture between cucumbers and celery, allowing to cool before sealing and placing in the fridge. Pickles are read after 2 hours but best the next day.

To Plate

Remove salmon from fridge and allow to come to room temperate, about 30 min. Place salmon on heavy gage sheet pan or large frying pan and use a torch to lightly char the top and the edges. Should you not have a torch, slight sear just one side of the salmon in a frying pan with just a little oil to assist in searing. Remove 1 TBSP of the pickled cucumber and celery from their containers and place on paper towel or cloth the remove excess moisture, set aside.

On the plate of your choosing, place salmon off center on plate then place both pickles beside, nestled up nicely by the salmon. From here, feel free to garnish as you wish, either with some micro herbs, a sprig a your fennel or even some fresh pea shoots.

Coconut and Chili Ice Cream

Coconut Chili Ice Cream, 2015-2

Coconut and Chili Ice Cream

2 cups Coconut Milk

2 cups Heavy Cream

1 cup Sweetened Condensed Milk

4 Large Chilies, Seeded and rough chopped

12 Egg Yolks

1 tbsp Sugar

½ cup fine shredded coconut

Procedure:

1) Combine coconut milk, cream in a medium saucepan and slowly start to heat on low heat. Meanwhile, slice each chili in half and scrape and discard the seeds. With the red flesh, chop and add to coconut/ cream mixture. Stir periodically on medium heat until just scalded (till you see steam rise off the mixture). Turn off heat and steep the mixture with the chilies for 10 min.

2) Meanwhile, in a medium bowl, either using electric mixer (medium high speed) or by hand, whisk together egg yolks with the 1 tbsp of sugar until light in color, Approximately 4 min by hand, unfortunately longer by hand. Set aside.

3) Using a medium frying pan on low heat, toast the shredded coconut stirring and tossing every 10-15 seconds till golden brown, 2-4 min. Remove to a separate bowl for holding and so they do not continue to brown and burn in a hot pan.

4) Pour ¼ of the coconut/cream mixture though a mesh strainer onto the yolks and mix till combined and to warm up the yolks to avoid cooking the yolks when adding them to the rest of the custard mix. Pour remaining mixture through strainer into the yolk mix removing remaining chilies and mix till well combined and incorporated. Pour back into the pot and on medium heat, whisk continually until the mixture thickens and coats the back of a wooden spoon. COUTION: DON’T BOIL AND AVOID MAKING SCRAMBLED EGGS.

Remove from heat and pour through strainer into separate bowl, removing any cooked yolks, and place in a ice water bath, mixing till cooled. Place in large zip lock bag and place in fridge for a minimum 4 hours or over night.

5) Freeze using ice cream machine of your choosing following the manufactures directions. Once finished, place in storage container and reserve in freezer till needed.

Pavlova!!!

Should you ever ask a person from Australia or New Zealand who makes the best or where pavlova originated, you will most likely cause a bit of a debate.  But all you really need to know is that pavlova is a most wonderful and versatile desert that is crisp and brittle on the outside and light, fluffy with a marshmallow like texture on the inside.  And the best thing about pavlova is that it uses only five ingredients and little bit of patients while it bakes.

This recipe that I am sharing with you was given to me my friend Damian O’Rourke who was the Chef at the New Zealand Embassy in Tokyo when I was working in Japan back in 2008-2009.  I have continued to use this recipe as my base for every variation that I have produced.  Like dad use to say, “If it ain’t broke, don’t fix it”, so I haven’t.

Enjoy!

Recipe: Pavlova with Kiwi & Mango Salsa

Pavlova

 6 Egg Whites

375 gr Sugar (reserve 6 Tablespoons in a separate bowl)

1 Tablespoon Corn starch

1-Teaspoon Malt Vinegar

1-Teaspoon Vanilla Essence

Topping

2-3 Ripe Kiwifruit

1 Ripe Mango

Pulp of 1-2 ripe passion fruit

Or – fresh berries with berry coulis, or other fruit of your choice

300 ml Fresh Cream

Procedure:

Pre- heat oven to 120 C or 250 F

Line a baking tray with foil.

Stiffly whip the egg whites, add 6 tablespoons of sugar and continue whipping until the mixtures is glossy and forms long peaks. Sift the corn starch with the remaining sugar and fold it into the egg whites with the vinegar and vanilla. Beat another 30 seconds.

Pile the mixture onto the foiled tray, use a ring mould to form a circle and spread the meringue smooth. Remove the ring mould and place the tray in the pre-heated oven, bake for 1¼ – 1½ hours until cream coloured and firm, but still soft inside.

Let the Pavlova cool to lukewarm then lift off the tray together with the foil and cool on a wire rack. When completely cool, invert the Pavlova onto a large plate or serving platter, peel away the foil. It can be kept covered for a few days in the fridge.

Not more than 2 hours whip the cream until soft, do not over beat. Spread the whipped cream over the top and sides of the Pavlova.  The Cream will soften the crust of the Pavlova to allow for easier slicing.

Peel & dice the Kiwifruit and Mango flesh, gently mix with the passion fruit pulp & chill before serving with a slice of Pavlova – I usually find it unnecessary to sweeten the fruit as the Pavlova contains enough sugar.

Ice Cream Recipe!!

Looking to make some of your very own ice cream? Here is the recipe for the ice cream base that I have been using now for the past four years. Feel free to change it up as you see fit and have some fun with it.

From this base I have produced flavor combinations such as “Mocha Espresso”, “Coconut and Chili”, “baileys Irish Cream”, “Avocado” and “Black Pepper”. Just remember, your imagination is endless and so too are the flavors for ice cream.

Recipe: Ice Cream Base 

2 cups milk

2 cups cream

½ cup sugar

12 large yolks

1 tbsp vanilla

Procedure:

In a saucepan, combine the milk, cream and 2tbsp of the sugar and bring to a simmer. While waiting, in a mixer or large metal bowl, whisk egg yolks and remaining sugar until thickened and lightened in color. Gradually whisk in a quarter of the warm milk mixture to temper the egg yolks, whisking continuously to avoid cooking the yolks. Continue to whisk in the remaining milk mixture, then return the mixture back to the saucepan and stir over medium heat until the custard had thickened and coated the back of wooden spoon. Pour custard into a bowl and set over an ice water bath and allow to cool to room temperature. Then strain into a container and refrigerate 4-6 hours or over night for the creamiest results as possible. Freeze custard in ice cream maker following the manufacturers directions.

I do recommend removing from the freezer about 10-15 min  before to allow to temp a little and make scooping a little easier.

Enjoy!

Leek and Potato Soup

So, last week I had an function that I was asked to cater for and as I had finished planning the menu, I realized that it has been a while since I have done a recipe for my blog.  And seeing how here in Brazil it is currently winter, if you call 22C winter, then why not do a winter soup from back home.

With images of white snow falling in large flakes collecting on the ground and people bundled up, this is a great little soup to have on ready.  Not over powering with leek or potato but still can be heightened in flavour by adding things such as brown butter, curried butter, diced bacon or even brown sugar candied bacon, you can’t go wrong.

Leek and Potato Soup 

Makes: 5 L

3 tbsp – canola Oil
5 – medium Leeks Rough Chopped (whites part only)
reserve green part for stalk
10gr – fresh thyme, still on the stem tied together for easy removal
4 cloves – garlic, crushed

1.5kg (7 medium) – potatoes, peeled and rough chopped

2.5 L – vegetable stock or water
salt and pepper to taste

Cream to desired creaminess (1-2 cups, YOUR CHOICE)

IMG_4560

In a large soup pot, heat oil on medium heat and add the leeks, garlic and thyme then reduce heat to low heat and sweat until soft with no browning, 5-10 min.

IMG_4562

Then proceed to add chopped potatoes with stock or water and bring to a boil on high heat. Once a boil has been reached, return to low heat and simmer for approximately 30-40min or until the largest potato is cooked through.

After, remove thyme and should you have an emersion blender, proceed to puree in the pot till the entire batch is smooth as possible. Or, if you do not have a emersion blender, use a regular blender but please make sure to only fill the blender half full, with the lid off BUT a towel over the top to allow hot air to escape so you don’t burn yourself and to not make a mess. Puree till smooth starting first on low speed for 10 seconds gradually proceeding to high speed.

From this point you can portion and freeze the soup till needed or return the soup to the pot and add cream until your desired creaminess is reached then adjust seasoning to taste.

Hope you enjoy.

IMG_4571

Leek and Potato soup with brown sugar glazed bacon and curried butter drizzle.

Mango Ice Cream

For the past month, we have been patiently awaiting the arrival of our sea shipment so that we could have all of our personal items to help make our new home in Rio feel more like home.  But also to get our hands on some cooking equipment that we had been starting to miss, one being our ice cream maker.  So with our shipment having finally arrived, we hit the local market and picked up a number of items, including some fresh locally grown Brazilian mangoes.  It was time to break out the ice cream maker and make our first batch of ice cream here in Rio.

I have made a number of ice creams in the past but not mango.  And just like all the other ice creams before, you always discover something new when working that particular ingredient.  For this batch, I used two mangoes and decided I would try pureeing the mango with half the milk and cream before adding to the cooked custard.  But after pureeing the mango with the dairy, I discovered that the mango actually thickened the milk and cream mix by itself.  At the end, this did not make too big of difference in the end result and still produced a great ice cream.  Only change I would make is to try roasting the mango to help bring out the flavor more our pureeing it with just a little water to make a puree out of the pulp using a little simple syrup.

IMG_8523

IMG_8525

IMG_8526

Home made Mango Ice Cream withSalted Strawberry,Rhubarb and Rosemary compote with Fresh Basil.

Home made Mango Ice Cream with Salted Strawberry,Rhubarb and Rosemary compote with Fresh Basil.

After making the batch you should wait at least 5 hours before digging in.  I think I got a little anxious to try the ice cream and about three hours later the top half had froze enough for me to get a single scoop.  So I quickly made a Salted Strawberry,Rhubarb and Rosemary compote and added some fresh basil for a quick little plate up.  For plating in a rush filled with excitement to give it a try, it turned out not too bad.